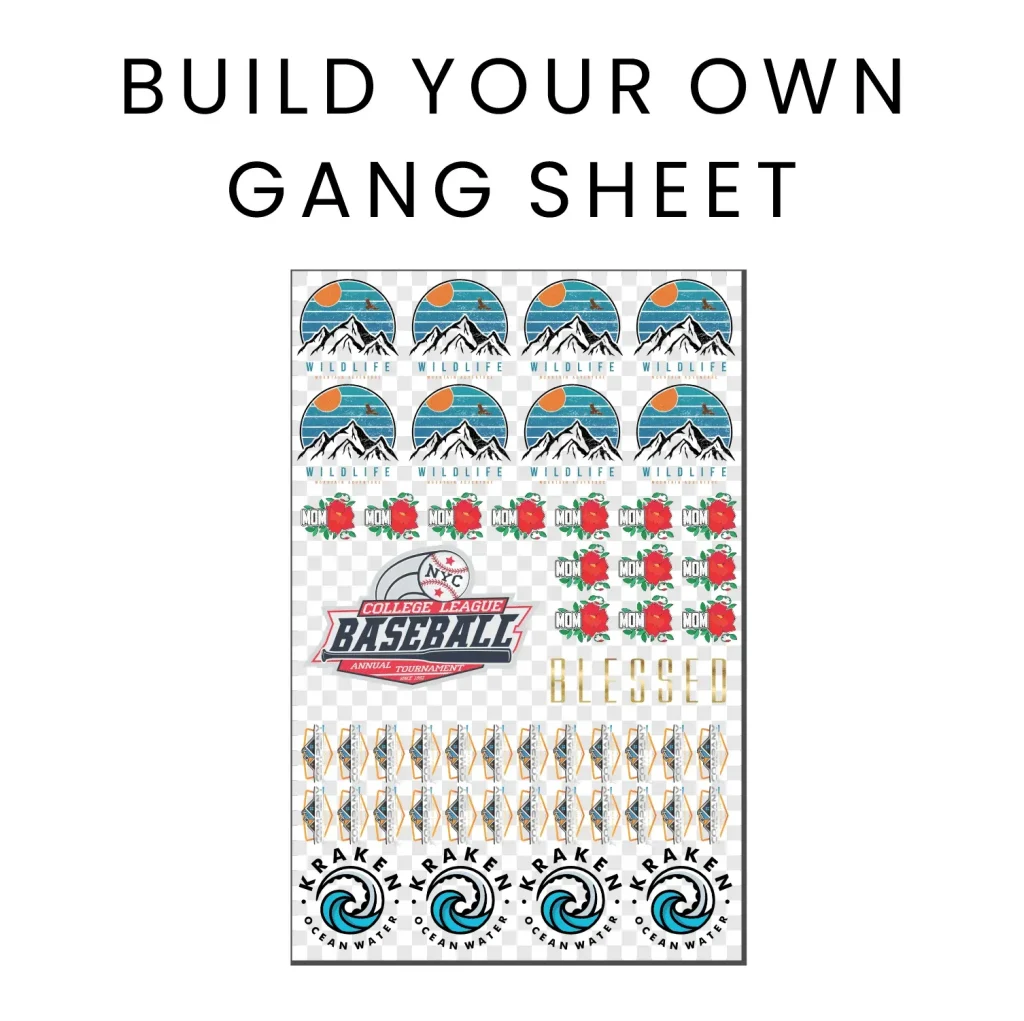
DTF Gangsheet Builder Tips offer a practical path to streamlining how you place multiple designs on a single sheet, helping teams move from concept to production with confidence. By following DTF spacing guidelines, you create a predictable grid that keeps margins consistent and gutters properly sized, which reduces misalignment risks during high-volume runs and helps teams verify layouts before any print. The guidance here focuses on thoughtful arrangement of colors, orientations, and tile boundaries to promote clean trimming, simple proofing, and repeatable results, even as you scale to multiple designs and complex colorways. From defining gangsheet margins and gutters to validating bleed coverage, these principles support scalable production, improved edge quality, and easier post-processing across batches, helping you stay on target with tight deadlines. Whether you’re a seasoned shop owner or a designer transitioning to gang sheets, adopting these tips will enhance efficiency, reduce waste, and elevate overall print quality.
In other words, the focus shifts to coordinating multiple artwork blocks on a single sheet to boost yield and consistency across orders. This approach aligns with modern print production concepts such as modular templates, precise registration, and controlled bleed margins that prevent edge gaps after transfer. By thinking in blocks, color blocks, and cut-safe zones, shops can streamline proofing, reduce rework, and maintain uniform results regardless of changes in design complexity. Adopting a template-driven workflow supports scalable output and helps teams communicate expectations around spacing, trim zones, and post-press finishing.
DTF Spacing Guidelines: Designing Consistent Gang Sheets
Spacing in DTF gang sheets is more than just separation; it determines how many designs fit on a sheet, how margins influence cutting accuracy, and how post-processing steps affect the final look. Following DTF spacing guidelines helps create a repeatable grid that reduces rework and speeds up production. Develop a grid-based layout in your design software that mirrors your printer’s actual print area, define a tile size for typical designs, and insert a consistent gutter between modules to lock the structure into a reusable template.
By choosing a baseline tile size—such as 6×6 inches for most designs—and a uniform gutter of 0.25 inches, you simplify placement and minimize overlapping images during proofing. Consider your printer’s registration tolerance and film edge behavior; if runs drift, a slightly larger gutter can prevent edge-to-edge misalignment. The goal is to balance density with reliability, aligning with DTF spacing guidelines that emphasize consistent margins and predictable shifts.
DTF Bleed Setup for Seamless Edges on Gang Sheets
Bleed is the safety margin that ensures color covers the full tile after trim. For DTF gang sheets, apply a modest bleed on all sides to accommodate minor misregistration and cover transfer area edges. A common starting point is 3 mm (about 1/8 inch) bleed, adjustable based on printer, film, and substrate. Apply bleed uniformly to every tile. This is part of your DTF bleed setup.
Set up bleed in design software by expanding artwork beyond tile boundary by the bleed amount. Ensure solid blocks extend into bleed; this prevents white gaps and helps with seams. Bleed interacts with garment seams; a bleed can help obscure slight misalignment, maintaining a seamless appearance across the garment. When you adopt a DTF bleed setup, you’re creating a buffer that protects the visual integrity of your final product.
DTF Layout Best Practices: Arranging Designs for Speed and Accuracy
Layout best practices involve arranging designs by color blocking, orientation, and anticipated downtime between transfers. A layout that minimizes tool changes and handling speeds throughput, aligning with DTF layout best practices. Consider how designs will be trimmed and finished to ensure steps won’t introduce alignment changes.
Color grouping near one another reduces ink and film changes and simplifies proofing. Group warm colors together and cool colors in another area, while preserving the grid’s integrity. Maintaining consistent margins and gutters across the sheet supports reliability and demonstrates strong DTF layout best practices.
DTF Gangsheet Margin and Gutters: The Key to Precise Cutting
Margins and gutters create the safe zone around each tile. Consistent margins support predictable cutting and reduce press wear. Maintain a standard gutter width across the sheet to avoid irregular edges and ensure repeatable results, reflecting the importance of gangsheet margins and gutters in production quality.
To accommodate substrate variability, include a small tolerance within templates for shifts without compromising overall look. This tolerance helps when fabrics stretch or when there are minor press differences, reinforcing the need to align with gangsheet margins and gutters for consistent results.
DTF Gangsheet Builder Tips: Streamlining Production with Templates
DTF Gangsheet Builder Tips emphasize using reusable templates that embed the grid, gutters, safe margins, and bleed areas. Automation reduces human error and accelerates order handling, especially when processing a high volume of orders.
Maintain a library of tile naming conventions and a robust pre-flight process. Standardized procedures support quick handoff from design to proof to print and help teams scale their gangsheet operations with confidence.
DTF Printing Workflow Optimization: From Proof to Press
From first proof to final transfer, a disciplined proofing process mirrors the end result and helps catch spacing or bleed issues early. Use quick, representative proof sheets that include bleed areas and gutters to verify tile boundaries and color relationships. Employ a single color management profile (CMYK if that is your standard) and export at 300 dpi to ensure crisp edges after heat transfer.
Automate layout assembly, standardize file exports, and implement a pre-press checklist to reduce waste and misalignment. These practices illustrate the value of DTF printing workflow optimization by improving predictability, throughput, and overall quality across jobs, even as production scales.
Frequently Asked Questions
What are DTF spacing guidelines and how do they influence gangsheet design?
DTF spacing guidelines establish the grid, tile size, gutters, and margins that determine how many designs fit on a sheet and how edges align. Use a baseline module (for example, 6×6 inches) with a consistent gutter (around 0.25 inches) and fixed safe margins to improve cutting accuracy and repeatability. Design with alignment marks or corner tiles and lock the grid into a reusable template so every job follows the same spacing pattern.
How do you set up DTF bleed and why is DTF bleed setup important for gang sheets?
DTF bleed setup ensures designs extend past the final trim line so there are no white edges after transfer. Start with a standard 3 mm (about 1/8 inch) bleed on all sides and apply it consistently to every tile in the gangsheet. In your design software, extend artwork into the bleed region and account for seams and edge behavior to keep edges clean after pressing.
What are DTF layout best practices for maximizing sheet efficiency and output quality?
DTF layout best practices involve planning the overall population of designs by color blocking, orientation, and finishing considerations. Group similar colors near one another to simplify color separation and minimize film changes, while preserving the grid. Place the most frequently printed designs in efficient positions, and use reference marks to maintain alignment across tiles.
How do gangsheet margins and gutters affect cutting accuracy and final results?
Gangsheet margins and gutters are critical for cutting accuracy and edge quality. Margins provide a safe boundary to prevent important artwork from being trimmed, while gutters keep consistent spacing between tiles to avoid crowding during finishing. Maintaining uniform margins and gutters across the sheet helps prevent misalignment and simplifies verification during proofing.
What steps help with DTF printing workflow optimization when building gang sheets?
DTF printing workflow optimization starts with reusable templates, standardized exports, and a clear handoff. Create templates that embed the grid, gutters, margins, and bleed areas; use a single CMYK profile and export at 300 dpi for crisp edges. Automate layout placement where possible and maintain a pre-press checklist to verify bleed, gutter spacing, and tile alignment before production.
How can I proof and validate DTF spacing guidelines, bleeds, and layout before a run to ensure consistency in gang sheets?
Proofing and validation steps include printing a quick, representative section of the gangsheet that mirrors final layout. Check tile alignment, confirm bleeds extend beyond tile edges, and verify there are no overlapping designs. If issues are found, adjust the template before committing to a full run to ensure spacing guidelines, bleeds, and layout remain consistent.
| Aspect | Key Points |
|---|---|
| Spacing fundamentals | Defines how many designs fit on a sheet, margins affect cutting accuracy, and supports repeatable grids; establish a grid-based layout with a reusable template; set baseline tile size (e.g., 6×6 in) and a gutter (e.g., 0.25 in); align with printer tolerance and ensure reliability. |
| Bleeds and edge considerations | Bleed ensures full-coverage beyond the final trim; typical bleed is around 3 mm per side; apply bleed to every tile; set up bleed by expanding artwork beyond tile boundaries; accounts for seams and edge alignment. |
| Layouts that maximize efficiency | Organize designs by color blocking, orientation, and downtime; minimize tool changes and handling; place frequently printed designs in efficient positions; ensure consistent margins and gutters; group similar colors to simplify color separation. |
| Proofing and validation | Create quick, low-cost proof sheets mirroring final layout; verify bleeds extend beyond tile edges; check tile alignment and overlaps; print a small representative section to verify color accuracy; iterate as needed. |
| Advanced tips for implementing spacing guidelines | Automate templates with grid, gutters, safe margins, and bleed areas; use reusable templates to reduce errors; maintain naming conventions; define a clear workflow from design handoff to proofing to printing; embed spacing guidelines into SOPs. |
| Common pitfalls | Inconsistent bleeds, misaligned tiles, overlooked margins; ensure identical bleed amounts across tiles; verify grid orientation; account for substrate variability by adding tolerance in templates. |
| Practical workflow tips | Standardize file exports and color management; export at 300 dpi; build a library of approved templates; automate layout placement; use a pre-press checklist to verify bleed, gutters, and alignment; document workflow for quick onboarding. |
Summary
DTF Gangsheet Builder Tips deliver a practical framework for achieving consistent, high-quality transfers by applying spacing, bleed, and layout principles. By standardizing grid-based spacing, consistent bleeds, and thoughtful layout decisions, shops can reduce waste, improve throughput, and produce repeatable results. Start by building a template library for your most common designs and integrate a quick pre-flight check into your workflow to scale efficiently and meet customer expectations.